Create a pivot table based on data from an external source
- General information
- Installation and launch
- Interface overview
- Screen elements
- Command menu
- Main menu
- Toolbar
- Change the display mode
- Hide or display tool group titles
- Hide or display the content of tool groups
- Customize the composition of the Favorites group of tools
- Add a button
- Change a button to run a macro
- Move an element
- Remove an element
- Clear the Favorites group
- Hide or display the Favorites group
- Formula bar
- Quick actions pane
- Workspace
- Sheet pane
- Sidebar
- Status bar
- Focus on cell
- Theme
- Language
- Files
- New file
- Save as template
- New from template
- Open a file
- File in .html, .htm, .xls format
- File in .xlsb format
- File in .xml format
- View-only file
- File is used by another application or user
- Convert a file
- Recent files
- Send a file
- Preview and print
- Save a file
- Autorecovery of documents
- Close a file
- Sheets
- Insert a sheet
- Switch between sheets
- Rename a sheet
- Hide or unhide sheets
- Change the color of the sheet tab
- Duplicate a sheet
- Copy a sheet
- Move a sheet
- Select a sheet from the list
- Zoom a sheet
- Hide or display zero values
- Delete a sheet
- Actions with multiple sheets
- Cells, columns, and rows
- Expand the workspace
- Select a cell range
- Active cell of the range
- Select colums or rows
- Multiple selection
- Resize cells
- Resize a column or row
- Merge or unmerge cells
- Insert columns or rows
- Hide or unhide a column or row
- Freeze columns, rows, or area
- Group columns or rows
- Delete columns or rows
- Data
- Enter data
- Enter data in a cell
- Automatically adjust cell width
- Floating cell
- Autofill cells
- Text formatting of formulas and numbers
- Sort and filter
- Create a range of filtering
- Sort
- Single-level sorting
- Multi-level sorting
- Filter
- Filter by values
- Filter by cell fill color
- Filter by condition
- Filter by numeric values
- Filter by date
- Filter by text
- Filter using the advanced filter
- Transfer of conditions between filters
- Use of wildcards
- Clear filter
- Copy and paste filtered data
- Reapply a filter
- Finishing work with sorting and filtering range
- Split into columns
- Data validation
- Add data validation
- Edit data validation
- Delete data validation
- Actions with cells containing data validation
- Enter a date
- Enter a value in a cell with a drop-down list
- Track and view changes
- Find and replace
- Delete data
- Remove duplicates
- Links
- Insert a link to a web page or email address
- Insert a link to a place in the document
- Insert a link to a file
- Quick link insertion
- Follow the link
- Copy a link
- Edit a link
- Delete a link
- Keyboard shortcuts for moving between window elements
- Notes
- Special characters
- Current date or time
- Spelling and grammar
- Number formats
- Define cell format
- Open number format settings window
- General
- Number
- Split the number into digit groups
- Change the number of decimal places
- Customize negative number display style
- Currency
- Select a currency code or symbol
- Change the number of decimal places
- Customize negative number display style
- Accounting
- Date, Time, and Date and time
- Percentage
- Fraction
- Scientific
- Text
- Formulas and functions
- Formulas and functions basics
- Order of operations in a formula
- Reference cells and cell ranges
- Recalculation of formulas
- Select formula recalculation mode
- Recalculation of formulas in automatic mode
- Recalculate formulas manually
- Recalculate formulas when saving a document
- Automatic calculation
- Enter functions
- Function wizard
- View and edit formulas
- View the structure of formulas
- Specifics of work in the collaborative edit mode
- Replace a formula with its result
- Names in formulas and functions
- Reference to data in another document
- Structured references
- Array formulas
- Calculation operators
- Tables
- Create a table
- Open the table settings pane
- Customize the appearance
- Rename the table
- Automatic table expansion
- Add a calculated column
- Select the type of calculation in the total row
- Convert a table to a regular range
- Delete a table
- Pivot tables
- Create a pivot table
- Create a pivot table based on the data in the current file
- Create a pivot table based on data from an external source
- Open the pivot table settings pane
- Define the structure of the pivot table
- Add fields
- Change the field order in a section
- Rename a field
- Select value calculation functions
- Delete a pivot table field
- Customize the pivot table parameters
- Change the data source
- Select the pivot table layout
- Customize the display of grand totals
- Customize the display of subtotals
- Enable viewing of cell details
- Edit captions
- Manage external sources
- View the list of external sources
- View information about an external source
- Change information about an external source
- Add an external source
- Delete an external source
- Filter data in a pivot table
- Filter data using the report filter
- Filter rows and columns by values
- Filter rows and columns by condition
- Clear the filter
- Sort data in a pivot table
- Collapse or expand the elements of pivot table
- View cell details
- Refresh a pivot table
- Copy a pivot table
- Delete a pivot table
- Charts
- Insert a chart
- Open the chart settings pane
- Chart settings
- Open chart elements settings
- Customize the appearance of an element
- Customize element text formatting
- Adjust the parameters of axes and gridlines
- Hide or display an element
- Move a chart
- Move the chart title
- Copy, cut or insert a chart
- Change chart type
- Resize a chart
- Change data in chart
- Change the data range for the chart
- Delete a chart or a chart element
- Images
- Insert an image
- Anchor graphic objects to cells
- Replace an image
- Resize an image
- Move an image
- Save an image
- Delete an image
- Embedded objects
- Shapes
- Insert a shape
- Insert a text box
- Fill a shape
- Outline
- Select the color of the shape outline
- Select the thickness and line type of the shape outline
- Apply outline settings of the previous shape
- Delete shape outline
- Line style
- Select a line color
- Select the thickness and line type
- Apply the style of the previous line
- Reset the line style
- Resize a shape
- Fit shape size to text
- Change line length and angle
- Select arrowhead type
- Move a shape
- Delete a shape
- Format
- Font
- Font size
- Text formatting
- Text color
- Highlight color
- Alignment
- Rotate text
- Wrap text
- Character spacing
- Cell fill color
- Cell borders
- Conditional formatting
- Create a formatting rule
- Conditional formatting pane
- Create a formatting rule
- Create a rule of the Regular highlighting type
- Create a rule of the Color scale type
- Create a rule of the Data bars type
- Create a rule of the Icons type
- Display and filter a list
- Move a rule in the list
- Edit rules
- Duplicate rules
- Clear formatting rules
- Copy and apply formatting
- Clear formatting
- Edit content
- Undo and redo
- Cut or copy data
- Paste the last cut or copied data
- Paste data while maintaining the original formatting
- Paste data without preserving the original formatting
- Insert a formula
- Insert the result of the formula calculation
- Paste data and transpose
- Clipboard history
- Change paste parameters
- Cloud actions
- Log in
- Server connection indicator and server certificate
- Create a file or folder
- Open a file
- Save the file to the cloud
- Create a local copy
- Upload a file
- Download a file or folder
- Delete a file
- Restore a file or folder
- Shared access to files
- Revoke own access
- Log out
- Automation tools
- AI assistant
- Document protection
- Functions manual
- Financial functions
- Date and time functions
- Math and trig functions
- ABS
- ACOS
- ACOSH
- ACOT
- ASIN
- ATAN
- ATAN2
- ATANH
- COSH
- COTH
- CSC
- CSCH
- DEGREES
- EXP
- FACT
- FACTDOUBLE
- INT
- LN
- LOG
- LOG10
- PI
- POWER
- PRODUCT
- QUOTIENT
- RAND
- ROUND
- ROUNDDOWN
- ROUNDUP
- SEC
- SECH
- SINH
- SQRT
- SQRTPI
- SUBTOTAL
- SUM
- SUMIF
- SUMIFS
- SUMPRODUCT
- SUMSQ
- TANH
- Statistical functions
- AVERAGE
- AVERAGEIF
- CORREL
- COUNT
- COUNTA
- COUNTBLANK
- COUNTIF
- COUNTIFS
- F.DIST
- F.DIST.RT
- FISHER
- LARGE
- LINEST
- MAX
- MEDIAN
- MIN
- MODE
- NORM.DIST
- RANK.EQ
- SMALL
- STDEV.S
- VAR
- VARA
- VARPA
- Lookup and reference functions
- ADDRESS
- AREAS
- CHOOSE
- COLUMN
- COLUMNS
- GETPIVOTDATA
- HLOOKUP
- HYPERLINK
- INDEX
- INDIRECT
- LOOKUP
- MATCH
- OFFSET
- ROW
- ROWS
- TRANSPOSE
- VLOOKUP
- Database functions
- Text functions
- ASC
- CLEAN
- CODE
- CONCATENATE
- DBCS
- EXACT
- FIND
- FINDB
- JIS
- LEFT
- LEFTB
- LEN
- LENB
- LOWER
- MID
- MIDB
- PROPER
- RIGHT
- RIGHTB
- SEARCH
- SEARCHB
- SUBSTITUTE
- TEXT
- TRIM
- UNICODE
- UPPER
- VALUE
- Logical functions
- Information functions
- Engineering functions
- Additional information
To create a pivot table using data from an external source, follow these steps:
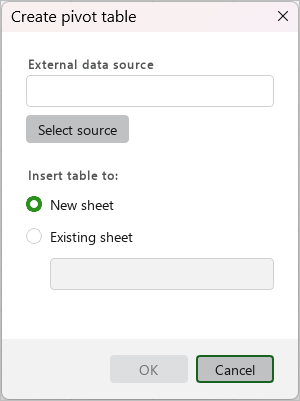
1.Open the Create pivot table window in one of the following ways:
•On the Insert tab, click  Pivot table. In the menu that opens, select Use external data source.
•When working in macOS, select the Insert > Pivot table > Use external data source command from the command menu.
2.In the Create pivot table window, click Select source.
3.In the External data sources window, click Add source and, in the file manager window that opens, select the file containing the data for the pivot table. If you want to use an external source that has already been added, proceed to step 5.
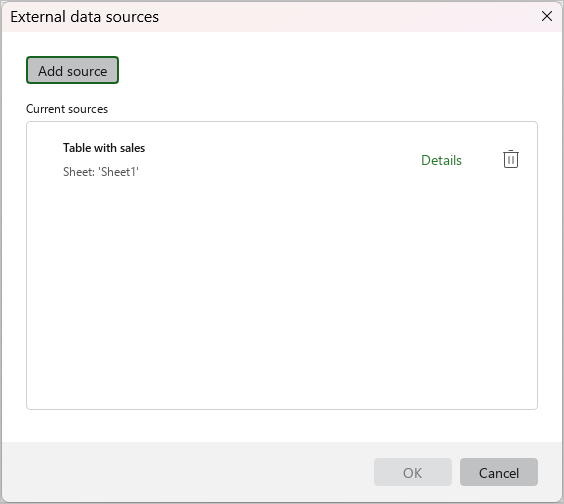
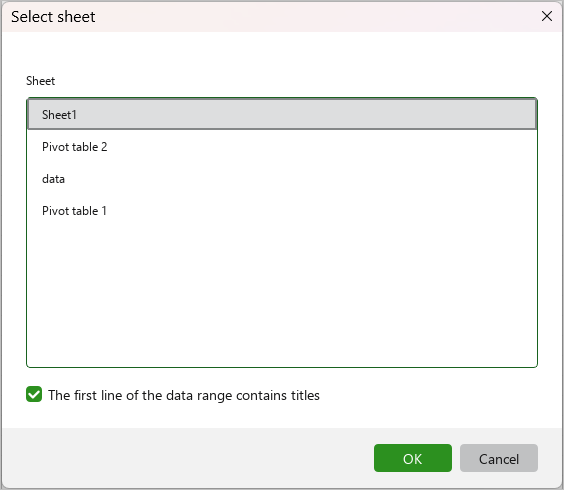
4.In the Select sheet window, choose a sheet from the external document from the list. Clear the The first line of the data range contains titles checkbox if you do not want to use the first row as a title. After the sheet is selected, click OK.
5.Select the desired document from the list of current sources and click OK.
6.In the Create pivot table window, specify the location of the table:
•New sheet: Insert the table in a new sheet. The new sheet will be created automatically. By default, the new sheet will be named Pivot table <No.>, where No. is the number of the pivot table in the document you are working on. If needed, you can edit the sheet name.
•Existing sheet: Insert the table on the sheet that is currently displayed on the screen. In the Specify a destination cell box, enter the cell address manually or click to select an empty cell in the workspace where you want the upper-left cell of the pivot table to be located. There should be at least two empty rows above the initial cells for filters.
7.Click OK.
Create a pivot table based on the data in the current file