Upload a file or folder
You can upload a file or folder to My documents section, as well as to the Shared and Common folders sections, provided that the user has editing permissions. If you perform the operation in the Flagged, Recent or Trash folders, the document to be created will be added to the My documents section.
By default, the size of the uploaded file should not exceed 5 GB. If the limit is exceeded, an error message will be displayed on the screen when the file is uploaded. This option can be changed by the administrator of MyOffice software.
You cannot load an empty folder into MyOffice Documents.
Convert files when uploading
When uploading documents of external format, you can upload them in the original format or with automatic conversion to the internal format for the possibility of editing them. This mode is regulated in the profile settings. The availability of the function is determined by the system administrator. For more information about convertible formats, see Supported formats.
Upload a file or folder from an external source
To upload a file or folder to MyOffice Documents from an external source, follow the procedure below.
1.Do one of the following:
•Click Add on the Navigation bar.
•Click with the right mouse button on an empty space on the workspace.
•Click Upload in the workspace.
2.In the opened menu, select the Upload File or Upload Folder command.
3.In the opened standard system window, select the file or folder that you want to upload and click Open.
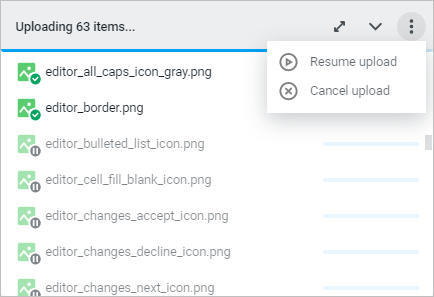
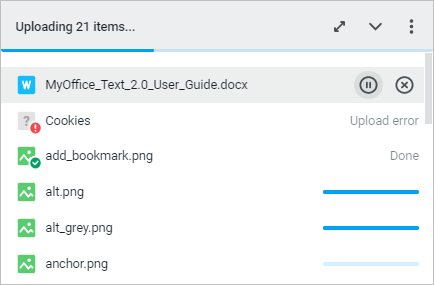
The bottom right corner of the screen will display a window with the list of uploaded items and the progress of the upload for each object is displayed. When you put the cursor on the operation in the list, additional buttons available for the operation (pause, delete, resume) will be displayed. If needed, pause, resume, or cancel the file upload by clicking  Pause,
  Resume or
  Cancel in the window with the list of the uploaded items or in the window with the operation details.
When uploading a folder containing sub-folders, you can cancel the upload of the sub-folders and the top-level folder. In this case, all folders will still be created and will contain the files uploaded before canceling the upload operation.
If the uploading of objects has been paused for a long period of time (the time of acceptable pause is configurable by the system administrator), a window will be displayed two minutes before the event to warn that the upload will be reset. The user can resume or cancel the upload from the warning window. If no action was selected, the upload operation will be canceled and a window will be displayed to inform the user that the operation has been canceled.
If the upload was suspended without user's participation (in case of communication breakdown with the server), the upload will be resumed automatically from the place where it was suspended after the connection is restored.
Once the uploading process is finished:
•If the item is uploaded successfully, it will be displayed in the workspace of the open folder. If an element with the same name already exists in the folder where you upload an element, a dialog box with relevant options will appear, depending on the type of element.
•Information about the file or folder uploading (successful/failed uploading) will appear in the window displaying the list of uploaded items.
Actions with matching file names
If the file or folder names match, the following actions are available: •Skip: Canceling uploading of an element with the same name. •Keep both: Saving the uploaded element with a new name (a number is added to the element name, for example, New document (2)). •Replace: Replacing the existing file with the copied file (available for files only). As a result of the replacement, a new version of the file will be created, the previous versions of the replaced file will remain in Version History, the sharing settings and public links to the file being replaced will continue to be active. A file opened in the editor cannot be replaced. When replacing it, the corresponding error will be displayed. To apply the selected action to all copied elements with matching names, select the check box Apply to all in the dialog box. The Replace command can only be applied to files. |
The window displaying the list of uploaded items
When uploading items, in the lower right corner a window with a list of uploaded objects and the progress of operations will be displayed. In the upper part of the window there are buttons to control the window (expand, collapse, access to additional operations with items in the list/close). When you put the cursor on the operation in the list, additional buttons available for the operation will be displayed:
If you expand the window with the list of uploaded items and the progress of operations, the screen will display detailed information about the operation. In the window containing the detailed information about the operation you can see the messages about each error and make a decision about them (resume or cancel the upload). When uploading a folder, you can expand the folder to see a detailed list of uploaded files:
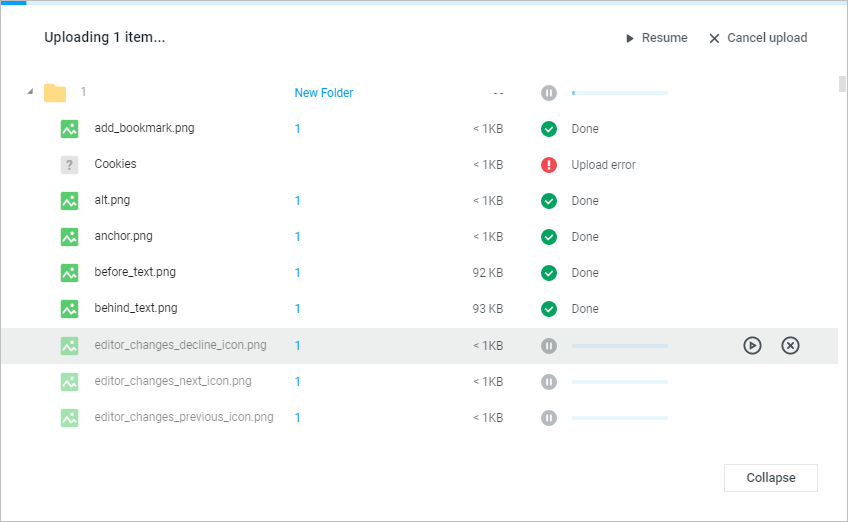
If the operation is completed with a status other than "Successful", the user will see the corresponding indication in the list of uploaded items and in the window with detailed information.
If you pause or cancel the upload using the additional operations access button at the top of the window, the upload of all pending operations will be paused or canceled: