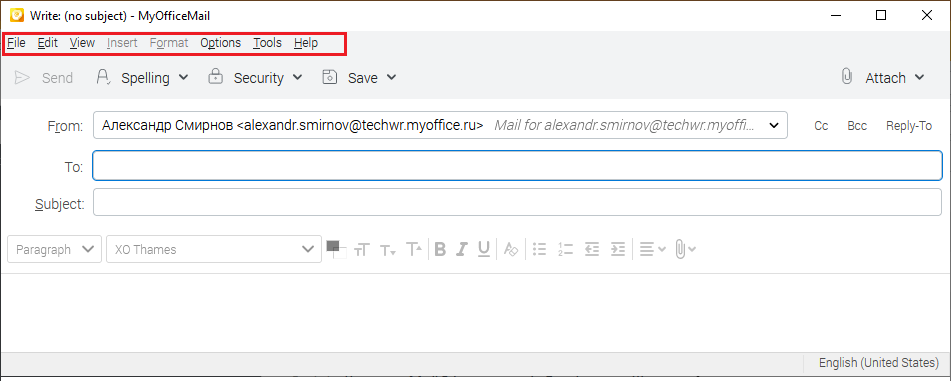
Menu bar of the message window
The message editing window menu bar looks as follows.

File
The File menu contains the following commands: 1. New: When this command is selected, a sub-menu opens with the following commands: •Message Ctrl+N/ •Address Book Contact: Create a new contact button. 2. Attach: When this command is selected, a sub-menu opens with the following commands: •File(s) Ctrl:+Shift+A/⇧Shift+ •Web Page: Opens a dialog box to enter the address of the web page that will be attached to the email. •Personal Card (vCard): Switch whether or not to attach a personal card to the email. •Remind Me Later: Enable/disable the attachment reminder mode. 3. Save Ctrl+S/ 4. Save As: When this command is selected, a sub-menu opens with the following commands: •File: The save mode switch, the e-mail will be saved as a file. •Draft: The save mode switch, the letter will be saved to the folder Drafts button. •Template: The save mode switch, the e-mail will be saved as a template. 5. Send Now Ctrl+Enter/ 6. Send Later Ctrl+Shift+Enter/⇧Shift+ 7. Print Ctrl+P/ 8. Close Ctrl+W/ |
Edit
The Edit menu contains the following commands: 1. Undo Ctrl+Z/ 2. Redo Ctrl+Y/ 3. Cut Ctrl+X/ 4. Copy Ctrl+C/ 5. Paste Ctrl+V/ 6. Paste Without Formatting Ctrl+Shift+V/⇧Shift+ 7. Paste As Quotation Ctrl+Shift+O/⇧Shift+ 8. Delete Del: Delete the selected text fragment. If there is no selection in the letter, the menu item is disabled. 9. Rewrap Ctrl+R/ 10. Rename Attachment F2: Rename an attachment. 11. Reorder Attachments Alt+X/⌥Option+X: Re-sort the attachments. 12. Select All Ctrl+A/ 13. Find Ctrl+F/ 14. Find and Replace Ctrl+H/ 15. Find Again Ctrl+G/ 16. Find Previous Ctrl+Shift+G/⇧Shift+ |
View
The View menu contains the following commands: 1.Toolbar: When this command is selected, a sub-menu opens with the following commands: •Menu Bar: Show/hide the Menu Bar. •Composition Toolbar: Show/hide the Composition Toolbar. •Formatting Bar: Show/hide the Formatting Bar. •Status Bar: Show/hide the Status Bar. 2.Zoom: When this command is selected, a sub-menu opens with the following commands: •Zoom In Ctrl++/ •Zoom Out Ctrl--/ •Reset Ctrl+0/ •Zoom Text Only: Apply zooming to message text content only. 3.To Field Ctrl+Shift+T/⇧Shift+ 4.Cc Field Ctrl+Shift+C/⇧Shift+ 5.Bcc Field Ctrl+Shift+B/⇧Shift+ 6.Contacts Sidebar F9: Open or close the Contacts Sidebar. 7.Attachments Pane Alt+B/⌥Option+B: Open or close the attachments pane. 8.Message Security Info: Show the message security information. |
Insert
The Insert menu contains the following commands: 1. Image: Open the to insert an image. 2. Table: Open the dialog box to insert a table. 3. Link: Ctrl+K/ 4. Named Anchor: Open the dialog box to insert an anchor. 5. Horizonal Line: Open the dialog box to insert a horizontal line. 6. HTML: Open the dialog box to insert HTML. 7. Math: Open the to insert LaTeX mathematical expressions. 8. Characters and Symbols: Open the dialog box to insert characters and Symbols. 9. Table of Contents: When this command is selected, a sub-menu opens with the following commands: •Insert: Open the dialog box for inserting/editing the table of contents. •Update: Open the dialog box for inserting/editing the table of contents. •Remove: Delete the table of contents. 10. Break Below Image(s): Insert a break under images. |
Format
The Format menu contains the following commands: 1. Font: Select the font type from the list of available options. 2. Size: Select the font size from the list of available options. 3. Text Style: Select the text style from the list of available options. 4. Text "f_xo_list_ind"> Open the text color selection dialog box. 5. Discontinue Text Styles Ctrl+Shift+Y/⇧Shift+ 6. Discontinue Link Ctrl+Shift+K/⇧Shift+ 7. Remove Named Anchors Ctrl+Shift+R/⇧Shift+ 8. Paragraph: Select the font style from the list of available options. 9. List: Format the list from the list of available options. 10. Increase Indent Ctrl+]/ 11. Decrease Indent Ctrl+[/ 12. Align: Set the horizontal alignment type based on the available options. 13. Table: Actions with a table. 14. Additional Properties: Open the edit dialog box with additional message properties. 15. Page Colors and Background: Open the with page colors and background settings. |
Options
The Options menu contains the following commands: 1. Check Spelling Ctrl+Shift+P/⇧Shift+ 2. Spellcheck As You Type: This setting allows for background spell checking when typing. 3. Quote Message: Quote the currently selected message. 4. Return Receipt: This setting allows for sending of a read notification. 5. Delivery Status Notification: This setting allows for receipt of a read notification. 6. Delivery Format: Select the message delivery format from the list of available options. 7. Priority: Select the importance of the message from the list of available options. 8. Send a Copy To: This option allows you to specify the folder where a copy of the message will be placed. 9. Customize From Address: Setting up the sender's address, if it is supported by the mail provider. 10. Encryption Technology: Selecting the encryption technology (OpenPGP, S/MIME). 11. Do Not Encrypt: Do not encrypt the message before sending. 12. Require Encryption: Request encryption before sending. 13. Digitally Sign This Message: Send a signed message. |
Tools
The Tools menu contains the following commands: 1.Mail & Newsgroups Ctrl+1/ 2.Address Book: Open the address book screen. 3.Account Settings: Go to the account settings screen. 4.Preferences: Go to the preferences screen. |
Help
The Help menu contains the following commands: 1.MyOffice Mail Help F1: Open the User's Guide in a separate tab. 2.Keyboard Shortcuts: Open the keyboard shortcuts help. 3.More Troubleshooting Information: Open the technical information useful for troubleshooting. 4.About MyOffice Mail: Open a dialog box with version information, legal notices, and terms of use. |
