Insert columns
- General information
- Installation and launch
- Interface overview
- Screen elements
- Command menu
- Main menu
- Toolbar
- Change the display mode
- Hide or display tool group titles
- Hide or display the content of tool groups
- Customize the composition of the Favorites group of tools
- Hide or display the Favorites group
- Quick actions pane
- Slide bar
- Workspace
- Sidebar
- Status bar
- Language
- Theme
- Files
- New file
- Open a file
- Recent files
- Preview and print
- Save a file
- Autorecovery of documents
- Close a file
- Slides
- Zoom
- Switch between slide thumbnails
- Slide numbers
- New slide
- Duplicate a slide
- Change slide layout
- Move a slide
- Hide or unhide a slide
- Slide background fill
- Fill slide with color
- Choose a color from the color sets provided
- Specify the color code manually
- Copy the color with an eyedropper
- Fill slide with image
- Remove the fill color
- Delete a slide
- Text
- Enter text
- Non-printable characters
- Font
- Font size
- Text formatting
- Text color
- Choose a color from the color sets provided
- Specify the color code manually
- Copy the color with an eyedropper
- Highlight color
- Alignment and spacing
- Horizontal alignment
- Vertical alignment
- Line spacing
- Character spacing
- Paragraph spacing and indents
- Rotate text
- Lists
- Create a list
- Change the list style
- Set the start number of the numbered list
- Change the bullet format
- Format a number or bullet character
- Customize indents
- Change the nesting level
- Copy and paste a list
- Convert a list to text
- Links
- Insert a link to a web page or email address
- Insert a link to a file
- Insert a link to the slide
- Quick link insertion
- Follow the link
- Copy a link
- Edit a link
- Delete a link
- Keyboard shortcuts
- Special characters
- Spelling and grammar
- Correction of spelling mistakes
- Turn off the underline for spelling errors
- Add a word to the dictionary
- Import of third-party dictionaries
- Delete a word from the dictionary
- Delete text
- Images
- Insert an image
- Replace an image
- Image outline
- Select the color of the image outline
- Choose a color from the color sets provided
- Specify the color code manually
- Copy the color with an eyedropper
- Select the thickness and line type of the image outline
- Apply outline settings of the previous image or shape
- Remove image outline
- Resize an image
- Change image position on the slide
- Move an image
- Delete an image
- Shapes
- Insert a shape
- Fill a shape
- Fill a shape with color
- Choose a color from the color sets provided
- Specify the color code manually
- Copy the color with an eyedropper
- Fill a shape with image
- Remove the fill color
- Shape outline
- Select the color of the shape outline
- Choose a color from the color sets provided
- Specify the color code manually
- Copy the color with an eyedropper
- Select the thickness and line type of the shape outline
- Apply outline settings of the previous shape or image
- Remove shape outline
- Line style
- Select a line color
- Choose a color from the color sets provided
- Specify the color code manually
- Copy the color with an eyedropper
- Select the thickness and line type
- Apply the style of the previous line
- Remove line style
- Resize a shape
- Change line length and angle
- Select arrowhead type
- Change shape position
- Move a shape
- Delete a shape
- Tables
- Insert a table
- Insert rows
- Insert columns
- Edit table content
- Select cells
- Select a column or row
- Select a table
- Resize a column or row
- Specify exact size of cells
- Change table size
- Merge or unmerge cells
- Cell background color
- Add the fill color to table cells
- Choose a color from the color sets provided
- Specify the color code manually
- Copy the color with an eyedropper
- Fill cells with an image
- Remove the fill color
- Cell borders
- Change border parameters
- Choose a color from the color sets provided
- Specify the color code manually
- Copy the color with an eyedropper
- Apply the border style of the previous table
- Delete borders
- Change table position
- Move a table
- Delete rows or columns
- Delete a table
- Charts
- Work with several objects
- Select objects and groups of objects
- Group or ungroup objects
- Manage selected objects
- Manage grouped objects
- Delete a group of objects
- Alignment of objects
- Edit content
- Edit outside the slide
- Select all
- Undo and redo
- Clipboard
- Clear custom formatting
- Slide show
- Slide show modes
- Start a slide show
- Slide show Control bar
- Switch slides
- Advance slides automatically
- Display the Slide bar
- Select objects on the slide
- Transition effects
- Laser pointer
- Manage screens in the presenter view
- Pause slide show
- Stop slide show
- Cloud actions
- Log in
- Server connection indicator and server certificate
- Create a file or folder
- Open a file
- Save the file to the cloud
- Create a local copy
- Upload a file
- Download a file or folder
- Delete a file
- Restore a file or folder
- Shared access to files
- Revoke own access
- Log out
- Password protection
- Education pane
- Additional information
- Feedback
New columns can be inserted to the left or to the right of the selected column.
To add new columns, follow the steps below:
1.Select the column to the right or left of which you want to insert a new column. If you want to insert multiple columns, select as many columns as you want to insert into the table. For example, if you want to insert two columns, select two columns. To run the command, you can select entire columns, as well as individual cells or cell ranges.
2.Insert columns in one of the following ways:
•On the Home tab, in the Table group, click the arrow to the right of the button for inserting columns and rows. Run the Insert column to the left or Insert column to the right command.
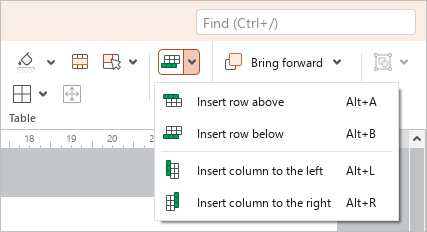
•Right-click anywhere in the selected range and run Insert column to the left or Insert column to the right command from the context menu.
•To insert a column to the left, press Alt+L. Or press Alt+R to insert a column to the right.
To quickly add a single column to the beginning or end of a table, follow these steps:
1.Select the table as an object.
2.To add a column to the beginning of the table, run the Insert column to the left command using one of the methods described above. To add a column to the end of the table, run the insert column to the right command using one of the methods described above.