Work with contacts
View a contact
To view information about a contact, select it in the contact list in the workspace: left-click anywhere in the contact's mini-pane, but not on the avatar. The contact details will be displayed in the Reading pane. |
Select contacts
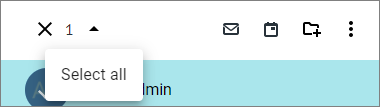
To select one or more contacts in the active address book, left-click on the avatar in the contact's mini-pane. To select all contacts of the current page of the active address book, do the following: 1.Left-click the avatar in the mini-pane of one of the contacts in the list. 2.Select the Select all from the drop-down list on the toolbar:
|
Create a new contact
Adding a new contact is only possible in the Personal address book and user-created address book. To create a new contact, follow these steps: 1.Click the New contact button on the Navigation bar and select the New contact command from the drop‑down menu. 2.In the window that appears, select the account (Contact location) for which the contact will be created. Only MyOffice accounts are available in the list, since there is no synchronization with the contacts of external accounts. 3.Fill in the required fields (first and last name of the contact being created). 4.If needed, fill in other fields 5.Click the Save button. The First name and the Last name fields are mandatory, whereas the remaining fields are filled in only if needed.
A new contact can be added to the address book from an email when it is viewed in the Reading pane or in a new tab. If, when creating a contact, the user clicks the |

Edit a contact
1.Left-click the contact's mini-pane. All available information about the contact will be displayed in the Reading pane. 2.Click 3.In the Editing a contact window that opens, make the required changes. 4.Click the Save button. If, when editing a contact, the user clicks the Attention!
You can edit only the contact that the user created themselves.
|

Find a contact
In each of the address books it is possible to search in a list. To find the desired contact, do the following: 1.Open the address book where the contact is located. 2.Click the 3.Enter a search query. The search results are automatically displayed in the contact list in the workspace. To close the search bar, click the To clarify the search criteria in the Corporate and Personal address book, do the following: 1.Click the 2.Enter the required search criteria. 3.Click the Find button.
|


Delete a contact
1.Select the address book where the contact is located. 2.Highlight or select a contact in the workspace. 3.Click 4.In the drop-down list, select the Delete command. Attention!
It is only possible to delete the contact that the user created themselves. Contacts from the Corporate group cannot be deleted.
|
Write an email to a contact
1.Select the address book in the Navigation bar. 2.Select the desired contact in the workspace by clicking on his avatar with the left mouse button. 3.Click A window for creating a new email will open in a new tab of the web browser, in which the required email address will already be inserted in the To field. |

Create a meeting with a contact
1.Select the address book in the Navigation bar. 2.Select one or more contacts in the list in the workspace by clicking their avatars with the left mouse button. 3.Click In a new tab of the web browser, Calendar application opens with an open window for creating an event, in which the contacts selected in the Contact application will already be indicated as participants. |

Export/Import contacts
To export contacts (upload to a fixed or external media on the user's device), do the following: 1.Select the desired contact or select one or more contacts. 2.Click 3.Select the Export command from the drop-down list. The contact file in the format .The vCard will be saved in the downloads folder installed on the user's device by default.
To import contacts, do the following: 1.Hover over the name of the address book in the Navigation bar and click on the button next to the name 2.Select a file or drag it with the mouse into the window that opens on the screen. 3.Click the Import button.
|

Forward the contact
To forward a contact to another user, do the following: 1.Highlight or select the desired contact in the address book. 2.Click the 3.Select the Send as attachment command from the drop-down list. As a result of the actions, a new email with an attached contact file in .vcf format will open in a new tab of the web browser. |
Merge contacts
To combine the cards of several contacts into one, do the following: 1.Select the desired contact or select one or more contacts that need to be combined. 2.Click the •On the toolbar of the workspace and select the Merge command. •On the toolbar of the Reading pane and select the Merge with another contact command. 3.In the window that opens, in the Add details to contact field, specify the contact in whose card the data from the selected contacts should be combined. 4.Click the Save button.
|