Main application settings
To open the calendar settings pane, go to the settings pane and click  .
.
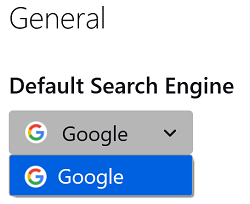
General
To select a search engine, in the General section, open the Default Search Engine list and select a search engine from the list.
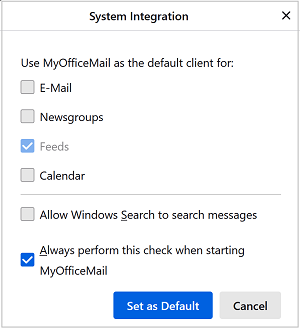
The System Integration section contains settings that allow you to regulate the interaction of the MyOffice Mail application and the system, such as: •Check the default client. •Move the application to the system tray when collapsing. •Allow Windows search to search for messages. To set additional system integration settings, click Check Now.
In the dialog pane that opens, select using MyOffice Mail application as: •Email client •Newsgroups client •News feed client •Calendar
Select Allow Windows Search to search messages to let Windows Search to search for messages in MyOffice Mail. Select Always perform this check when starting MyOffice Mail to use this check by default at startup. Click Set as Default to apply the settings you have configured. |
Language & Appearance
In the Language & Appearance section, you can customize the interface language settings, as well as the way the application is displayed. Select the default font type and size. Click Advanced to open a dialog pane which allows you to configure additional font settings.
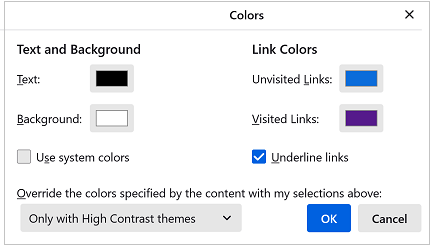
Click Colors to open a dialog pane which allows you to customize the colors of text and links.
The Language & Appearance pane also allows you to configure the following parameters: 1.The way emoticons are displayed (images or text). 2.Quote formatting (style, size, color). 3.Date and time format (application language format or from regional standards). 4.The language for displaying menus, messages, and notifications from MyOffice Mail from the list: Russian, English, Spanish, Portuguese, French. 5.Scrolling settings (Use autoscrolling, Use smooth scrolling). |

Incoming Mails
In the Incoming Mails section, you can configure notification settings when new messages are received. Click App Icon Options, and a dialog pane will appear on the screen allowing you to show or hide the application icon for the number of emails on the application icon, as well as display either the number of unread messages or the number of new messages on this icon.
If you need to show notifications about receiving new messages, select Show an alert. To set up mail receipt notifications, click Customize. A dialog pane will appear on the screen. In this pane, specify the fields that you want to display in notifications about receiving messages: Message Preview Text, Subject, Sender. If needed, set the time for displaying the notification of the receipt of email (in seconds).
Select Use the system notification to display system notifications when new messages are available. Select Show a tray icon for unread messages to display an icon about unread messages in the system tray. Recommended when using small taskbar buttons. Select Play a sound for an audible alert about the receipt of new emails. To use the system signal, select Default system sound for new mail. To use your own signal, select Use the following sound file, then click the Browse button and download the audio file from the hard drive. |

Files & Attachments
In the Files & Attachments section, you can configure actions with attachments: 1.Setting up an action to open different types of attachments. 2.Set a specific path for saving files. 3.Configure a path request before each file saving. |
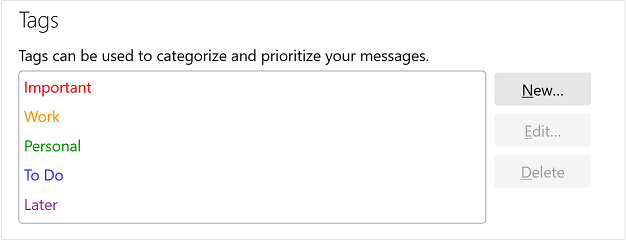
Tags section
Configure a set of message tags in the Tags section.
To add a new tag, click New. In the dialog that opens, select the tag name and color. Once created, the new tag will be added to the list. To change an existing tag, select the tag name in the list and click Edit. In the dialog that opens, change the label name and color as needed. Once modified, the tag will be updated in the list. To delete an existing tag, select the tag name in the list and click Delete. |
Read and display messages
In the Reading & Display section, you can configure the following notification settings when receiving new messages: 1.Automatically mark messages as read (immediately after opening, or after viewing for a specified period (in seconds)). 2.Message opening mode (in a new tab, a new window, an already existing window). 3.Close the message window/tab when it is moved or deleted. 4.Addressee name display mode (show only the name for people in my address book). 5.Processing mode for return receipts. |
Network & Disk Space
In the Network & Disk Space section, you can configure network connection and disk storage settings. In the Connection section, click Settings. This will open the Connection Settings dialog pane. In the Offline section, click Offline button. This will open the Offline Settings pane. In the Disk Space section, you can configure caching and folder compression. 1.The pane displays the current cache size. Click Clear Now to clear the cache. 2.Enable or disable automatic cache management, if necessary, set the maximum cache size (in MB). 3.Select Compact all folders, set the amount of free disk space (in MB). Select Ask every time before compacting to confirm compression. In the Indexing section, you can configure caching and folder compression: 1.Enable or disable global search and indexing of messages. 2.Select the type of message storage for new accounts (File per folder (mbox), File per message (maildir)). 3.Enable or disable hardware acceleration. |
Config Editor
|