Cell borders
Change border parameters
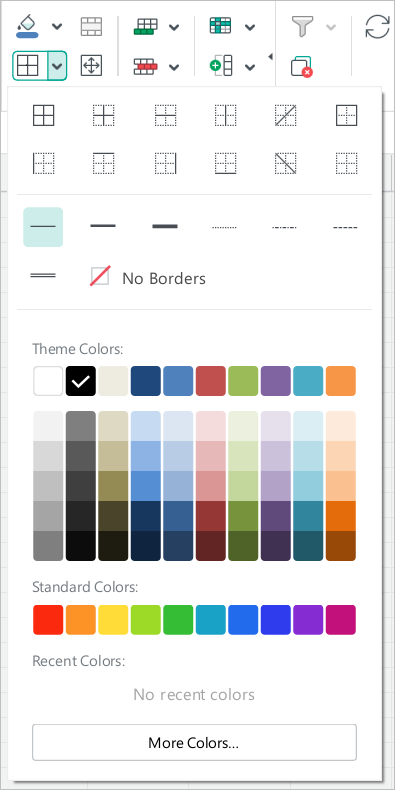
By default, when you create a document, there are no borders between cells. The grid visible on the sheet conventionally separates cells one from another to make working with data easier, and is not displayed when printing. To add borders to cells or change settings previously applied to borders, follow these steps: 1.Select the desired cell or range of cells. 2.On the Toolbar, in the Cells section, click the arrow to the right of the 3.In the border settings pane that opens, in the first settings block, specify the position of the borders for which you want to change the parameters. 4.In the second block of settings, select the type of line to be applied to the specified borders. 5.In the third block of settings, specify the line color using one of the following methods: •Choose a color from one of the color sets provided. •Specify the color code manually. •Copy the color with an eyedropper.
Border settings pane Choose a color from the color sets provided In the border settings pane, you will find the following sets of colors in the third settings block: •Theme Colors: This block contains the color palette of the current document's theme. •Standard Colors: This block contains the colors that users most often choose when formatting a document. •Recent Colors: This block contains up to the last ten colors that you selected when formatting the document earlier. The Recent Colors set is displayed if you have selected at least one color. Hovering the mouse cursor over any color displays the value of that color in the RGB color model. For example, RGB 192,80,77. Left-click a color to select it. The color will be added to the Recent Colors set and checked. The cell borders will be colored in the selected color. To close the border parameters pane, do one of the following: •On the Toolbar, in the Cells section, click the arrow to the right of the •Click a blank area of the document outside the pane. Specify the color code manually If you do not find the appropriate color in the listed color sets, specify the color code manually: 1.Click More Colors. 2.In the Select Color window that appears, specify the desired color as a HEX code or in RGB format. 3.Click OK. The manually specified color will be added to the Recent Colors set and checked. The border settings pane will close. The cell borders will be colored in the selected color. Copy the color with an eyedropper You can use the eyedropper to simultaneously copy a color from a text or object located in the main window's workspace and apply that color to cell borders. To copy a color using the eyedropper, follow these steps: 1.Click 2.Hover the cursor over the color in which you want to color the cell borders. For more accurate color selection, refer to the area to the right of the cursor. It displays the color of the pixel that the cursor is currently hovering over. 3.Left-click the color. The cell borders are colored in the selected color, and the cursor returns to its standard appearance. The specified color is added to the Recent Colors set and checked in the border settings pane. If you want to disable the eyedropper without selecting a color, press Esc. |
Apply the last selected border style
To quickly apply the last selected border style to a cell or range of cells, follow these steps: 1.Select the desired cell or range of cells. 2.On the Toolbar, in the Cells section, click |
Delete borders
To delete specified cell or cell range borders, follow the steps below: 1.Select the desired cell or range of cells. 2.On the Toolbar, in the Cells section, click the arrow to the right of the 3.In the border settings pane that opens: •In the first block of settings, specify where you want the borders to be deleted. •In the second block of settings, select No Borders. 4.To close the border parameters pane, do one of the following: •On the Toolbar, in the Cells section, click the arrow to the right of the •Click a blank area of the sheet outside the pane. |
 button.
